If you have just bought a robotic lawn mower then I can appreciate how much of an investment you will have made. These tools don’t come cheap so new owners are keen to keep their robot mowers healthy, effective and well maintained.
You could be fooled into thinking that, since robotic lawn mowers are much more technologically advanced, they’re more of a pain to maintain. But this is not the case. Compared to your traditional lawn mower, a robot mower is far easier to take care of. This is especially true if you’ve been used to maintaining a petrol lawn mower.
However, that isn’t to say that there isn’t any maintenance at all to consider. There are still some things you will need to do including keeping your mower clean and taking good care of the batteries. In this guide, I’ll be covering everything you need to know to keep your robot lawn mower in the best condition so it can continue to serve you for years to come.
DIY Robotic Lawn Mower Cleaning and Maintenance Tasks
- Inspection: Regularly inspect the mower for any signs of wear or damage.
- Cleaning the Exterior:
- Wipe down the mower’s body with a damp cloth to remove dirt and grime.
- Use a soft brush to clean off any stubborn debris.
- Blade Maintenance:
- Check the blades for dullness or damage.
- Clean the blades to remove grass and sap buildup.
- Sharpen or replace the blades as necessary, following the manufacturer’s guidelines.
- Wheel and Chassis Care:
- Clear wheels and the chassis of mud, grass, and debris.
- Ensure wheels move freely without obstructions.
- Charging Contacts:
- Clean the charging contacts on the mower and the docking station to ensure good connectivity.
- Use a dry cloth or a contact cleaner for any tough residue.
- Battery Care:
- Check the battery level and recharge if needed.
- Store the battery according to the manufacturer’s recommendations, typically in a cool, dry place.
- Software Updates:
- Check for any available firmware or software updates from the manufacturer.
- Install updates as needed to ensure optimal performance.
- Winter Storage:
- Fully charge the battery before storage.
- Disconnect the battery if advised by the manufacturer.
- Store the mower in a dry, sheltered location to protect it from the elements.
- Spare Parts:
- Keep a stock of essential spare parts like blades or screws for easy replacement.
- Professional Service:
- Consider a professional service check-up if the mower is experiencing issues beyond basic maintenance tasks.
Robot Mower Maintenance – Why is it Important?
Some people are lulled into the belief that, since a robot lawn mower doesn’t need a lot of ongoing maintenance, they could skip it altogether. But it’s really important you don’t fall into this trap. If you don’t do the minimal maintenance required for your robotic lawn mower, it isn’t going to be as effective and serve you well.
If the mower is not properly maintained, it isn’t going to perform to the best of its ability. This means that your grass won’t be as well kept and in the end, you’re going to have to fork out for more expensive repairs.
Keeping your robot lawn mower is also really important as grass clippings will build up over time. If these aren’t removed, they can hinder the performance of your mower and eventually put wear on the parts, shortening the lifespan of your machine.
Maintaining your robotic mower will also ensure that other features, as well a cutting, are maintained. These include sensors such as rain and bump sensors and of course the wheels, ensuring they do not become clogged and loose grip.
How to Clean Your Robot Lawn Mower
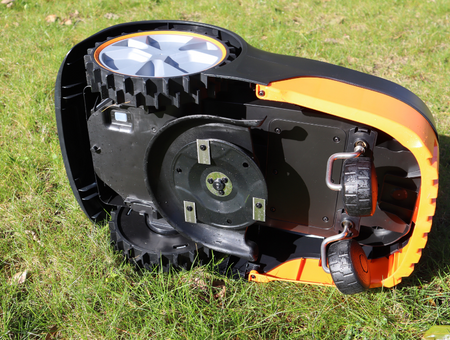
As I have mentioned, keeping your robot lawn mower clean is so important. According to ROBOMOW, you’ll want to clean your robotic lawn mower every 3 weeks or so. That said, if you notice that it needs a quick spruce up before that, there’s nothing stopping you. In fact, it’s probably a good idea to do it sooner rather than later.
- Start by ensuring that the master switch is turned off. You don’t want any accidental start ups while you’re cleaning.
- Now turn your robot lawn mower upside down so that you can see the blades and make sure it’s on a stable surface.
- You can use a coarse brush to remove any grass clippings. Make sure that you pay close attention to the wheels and the cutting mechanism as these are areas where grass might particularly build up.
- It is possible to use the narrow nozzle on your vacuum cleaner if there are any clippings stuck in hard to reach areas. Alternatively, you can use compressed air to blow clippings away.
- Once you have removed all of the visible dirt from your robot mower, you can now turn the mower back over and allow any final clippings to fall out.
- Give everything a wipe over and you’re then ready to put the robot back to work.
- Some robotic mowers are IP rated and allow the underside of the deck to be lightly sprayed down using a garden hose. Check you user manual to see if this is an option.
Cleaning Your Robotic Lawn Mower with a Hose
When it comes to cleaning your robotic lawn mower, it’s essential to know that while some models are designed to withstand a light hosing down, others may not be water-resistant and could be damaged by such cleaning methods. The key is to consult your user manual before proceeding. Manufacturers will specify whether your particular model can handle being cleaned with a hose. If your mower is indeed hose-friendly, use a gentle spray to remove loose grass and dirt, taking care not to direct water toward any sensitive electrical components. For mowers that are not designed to be water-resistant, stick to using a damp cloth or a handheld brush to keep your device clean. Always ensure that your robotic lawn mower is turned off and that all safety precautions are followed during the cleaning process.
Taking Care Of The Batteries
Robotic lawn mowers mainly run on lithium-ion batteries. Generally speaking, these have a lifespan between three and six years. However, this could be shorter if the batteries aren’t properly taken care of. At some point, you will need to replace the batteries and a good way of knowing when to do this is to look at the charge capacity.
Once this falls below 75%, you will need to buy new batteries. However, up until this point, it’s essential to provide proper maintenance.
When you aren’t using the robotic lawn mower during the winter months, be sure to remove the batteries and store them separately. Moreover, you will need to make sure that you don’t expose the batteries to extreme temperatures or moisture. I’ll talk more about storing your batteries later on.
Always check your batteries before use to make sure that there is no visible damage. If there is, discard them and buy replacements.
The Charging Station
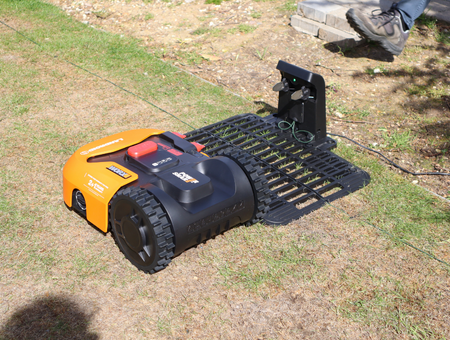
As well as taking good care of the batteries, it’s crucial that you keep your charging station well maintained. One of the simplest things you can do for this is to keep it clean; wiping it over with a damp cloth to remove any visible dirt is all you’ll need to do.
Additionally, you will want to do some general maintenance on it at least once every year. This involves checking for corrosion on the contacts. If there is, you can simply sand this away with sandpaper to ensure a good connection between mower and charger.
Look for any damage to wiring and other components. If you notice anything and it’s not something you can fix yourself, it’s important to take it to a professional for repairs. If you don’t, and you attempt to fix it yourself, you may cause damage which could void your warranty. Breaks in the perimeter wire can be easily fixed as most manufactures provide a repair kit with the mower.
Robot Lawn Mower Winter Storage
When preparing your robot lawn mower for winter storage, around October here in the UK, it’s important to ensure that it is properly cleaned and maintained before being put away for the off-season. Start by removing any grass clippings, dirt, or debris from the machine’s body and blades. It’s also a good practice to check and clean the wheels and charging contacts. Once the mower is clean, fully charge its battery and then disconnect it to prevent any potential for overcharging. If possible, store the battery separately in a cool, dry place to prolong its lifespan. The mower itself should be stored in a dry, sheltered environment to protect it from the elements and extreme temperatures. Additionally, consult the user manual for any specific storage instructions provided by the manufacturer, as proper maintenance can help ensure your robotic lawn mower will be ready for use when the grass begins to grow again in the spring.
Storing The Charging Station
Your charging station doesn’t need to stay outside over winter. It’s entirely possible to remove this and pop it into storage to keep it safe while the weather is bad. That said, if the winter looks set to be pretty mild, you probably won’t need to.
When storing the charging station, do make sure that you provide insulation for the ends of the boundary wire that it was connected to. Something like an insulating tape will work well.
Storing The Robot Lawn Mower
Before you put your robot mower away for the winter, give the batteries one final charge. I wouldn’t recommend completely filling them up; around 70% should be sufficient. If you charge them any more than this, they’ll likely discharge more quickly in cold temperatures so it’s merely a waste of time.
Once you have done this, I’d also recommend giving the mower a final clean before you put it away. Choose somewhere that is clean and dry and that won’t be affected by frost. It’s also important to store the lawn mower somewhere that has good airflow.
Changing The Robot Mower Blades
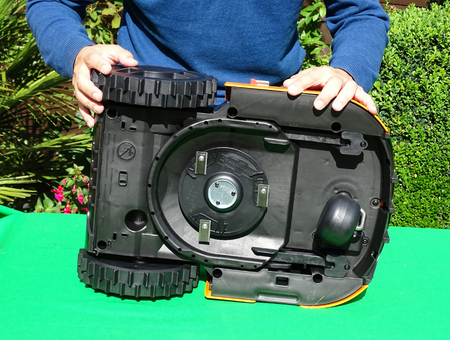
Some manufacturers suggest changing the blades on your robot lawn mower every one to three months. However, this is going to vary massively depending on how much you use the lawn mower and your lawn conditions. When you notice that the tips of the grass look a little whitened after cutting, this is a good sign that the blades have gone too dull.
If you don’t change the blades then the robot lawn mower won’t perform as well as it isn’t going to be able to cut as effectively. More than this, when you use a dull blade, it will rip the blade out of the ground causing the lawn to become unhealthy.
Before you change the blades, it’s important to familiarise yourself with the type of blades you have. There are generally two types of robot lawn mower blade as follows:
- Blade discs which are used by manufacturers like WORX, Husqvarna, Yard Force, Honda, Bosch, Gardena, McCullock and redback. The advantage of these blades is that they’re much quieter and generally safer.
- Star Crosses which are used by ROBOMOW, John Deere, Wiper, Stiga, Ambrogio and Wolf Garten. These blades are far more robust and won’t dull as quickly as blade discs.
Changing Blade Discs
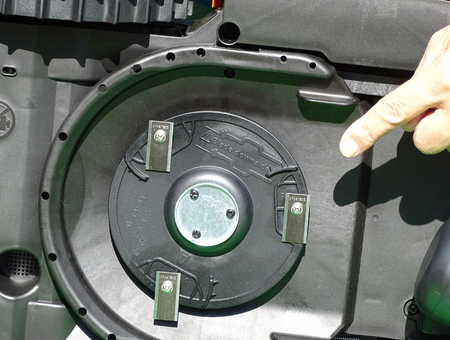
Robot lawn mowers with blade discs, normally containing 3 razor sharp blades, will need replacements no less than every three months, as a rule of thumb. As I mentioned earlier, this has a lot to do with how often the mower is used so this may vary.
The good news is that changing the blade discs is super simple and you won’t need a whole host of specialist tools. Generally speaking, you’re only going to need a screwdriver. That said, it’s important to only use a manual screwdriver as a powered one may cause the blades to fly off as you attach them.
- Protect your hands with some safety gloves because the blades can be razor sharp and cause injuries.
- Make sure that the robotic lawn mower is switched off before performing any maintenance.
- Unscrew the dull blade or blades and clean underneath using a coarse bristle brush.
- Attach the new blades and screw them into place.
- Before starting the mower, manually check whether the blades turn without difficulty. If they don’t then there’s a good chance they haven’t been installed correctly.
Changing Star Crosses
Changing star crosses may be a little more complicated but that’s only because there are a couple of different subtypes so you need to know what you’re working with.
The blades used by ROBOMOW are different from other brands in that they are more triangular. They’re much easier to change as they use a click system so it’s pretty foolproof.
- Make sure to turn the lawn mower off before starting the process.
- You will have a blade clamp in the kit which you will need to clamp onto the two holes. Do this so that the blade clamp can be turned and the hooks pressed together.
- Now you just need to press the clamp together and pull out the old blade. Now is a good time to clean underneath if necessary.
- Simply press the new blade into place until it locks and you’re good to go.
If you have a John Deere, Stiga, Ambrogio or Wiper model then these feature either a 4 point or 6 point star cross blade. These are fitted differently in that they must be secured using screws in the centre. The great thing about these is that they don’t need replacing anywhere near as often as the smaller razor blades. Typically, you might only need to do this once a season.
- Turn the robot lawn mower off before you start.
- Locate the screws that hold the blade in place; these are typically located towards the centre of the blade.
- Use a screwdriver to loosen these and remove the old blade.
- Clean underneath using a coarse brush to remove any grass clippings and other debris.
- Install the new blade and tighten the screws to keep it in place.
Cleaning and Maintenance Of Your Robotic Mower Video
Conclusion
One of the great things about robot lawn mowers is that they don’t require a lot of input from the user. All you need to do is set up the boundary wires and a mowing schedule and let the machine work its magic.
That said, there is a small degree of maintenance involved but again, it’s very minimal. Keeping your robot lawn mower clean and well maintained will ensure a longer lifespan and better performance. It’s certainly worth investing the little time it takes to achieve this.
As a seasoned expert in the field of garden power tools, I have dedicated over a decade to working with and reviewing a wide variety of lawn mowers. My extensive experience has allowed me to gain a deep understanding of the benefits and limitations of different types of mowers and garden tools.
Over the years, I have honed my skills in writing informative articles and creating helpful videos for various blogs and publications. This has given me the ability to not only recognise what makes a good lawn mower, but also to help you choose the perfect garden tool for your specific needs and requirements.
With my wealth of knowledge and expertise, I am confident that I can provide you with valuable insights and recommendations when it comes to selecting the right lawn mower for your lawn. So, whether you're looking for a battery cordless, electric, petrol, or robotic mower, you can trust in my expertise to guide you towards the best option for your garden.


