How to Change the Blade on Your Lawnmower
This 4 step process outlines the key steps to safely and effectively change the blade on your mower.
- Turn off mower and make safe (remove battery, disconnect from power, remove sparkplug)
- Remove old blade
- Install new blade
- Tighten and ensure fitted correctly
Regularly changing the blade on your lawnmower is crucial for maintaining its efficiency and performance. A dull or damaged blade can lead to uneven cutting, excessive vibration, and a messy-looking lawn. In this comprehensive guide, I will take you through the step-by-step process of replacing the blade on your lawnmower. If you prefer visual instructions, you can also refer to my video guide below.
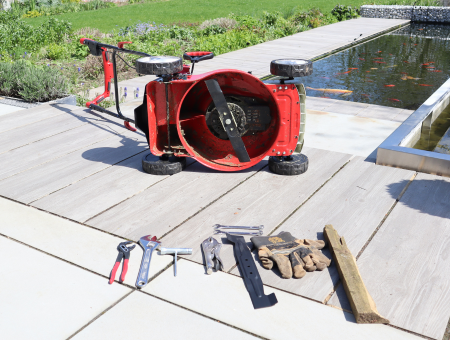
Before you begin, it is essential to gather the required tools and equipment. You will need a socket wrench or spanner, a new blade, and a pair of gloves. Additionally, ensure that your lawnmower is turned off and disconnected from the power source (or with the spark plug removed for petrol mowers) before commencing the blade replacement process. Once you have all the necessary tools and have taken the safety precautions, you can proceed with changing the blade on your lawnmower.
Importance of Changing Your Lawnmower Blade
A sharp blade is essential for cutting grass cleanly and efficiently. A dull blade can tear the grass, leaving it vulnerable to diseases and pests. A sharp blade, on the other hand, will make clean cuts, reducing the risk of diseases and pests. It will also reduce the amount of stress on the lawnmower’s motor, increasing its lifespan.
Likewise, a damaged blade can cause serious damage to your lawn. A blade that is bent or cracked can cause uneven cuts, resulting in an uneven and unhealthy lawn. A damaged blade can also cause the lawnmower to vibrate excessively, leading to premature wear and tear of the motor.
Regularly changing your lawnmower blade is essential to maintaining a healthy lawn. It is recommended to change the blade at least once a year, or more frequently if you have a large lawn or the blade gets damaged. Of course, you can sharpen the blade, however blades are relatively inexpensive and in my opinion changing the blade is a better, quicker and safer solution.
In summary, it is important to regularly check and change your lawnmower blade both before and during the mowing season to promote a healthy and attractive lawn.
Step-by-Step Video Guide
Preparing to Change Your Lawnmower Blade

Gathering the Necessary Tools and Materials
Before changing the blade on your lawnmower, it is important to gather all the necessary tools and parts. This will ensure that you have everything you need to complete the task without any interruptions.
Gloves
Firstly, you will need a pair of gloves to protect your hands from any sharp edges on the blade to prevent any injuries. The gloves will also help to ensure that you can grip the blade to hold it firm while releasing the bolt.
New Blade
You will also need a new blade to replace the old one. Make sure to purchase the correct blade size and type for your lawnmower make and model. Remember, if your mower mulches and you have a mulching plug, ensure that your new blade is compatible with the mulching process.
Wrench or Spanner

A wrench or spanner is necessary to remove the old blade and install the new one. Make sure to have the correct size wrench or spanner for your lawnmower. You can check the manual or contact the manufacturer to determine the correct size.
Blade Locking Tool
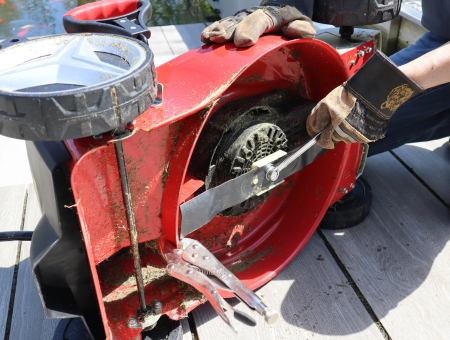
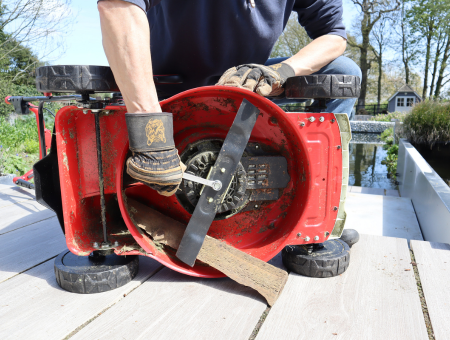
When releasing the bolt on your lawnmower to remove the blade, the blade will naturally turn around, so will naturally need to be locked off. There are several options to lock the blade, the first being a specially designed tool that clumps to the deck and prevents the blade from turning. The second option is a piece of wood that can be wedged between the deck and the blade to stop the blade from turning. Lastly, you can you a pair of locking pliers that is clamped to the deck and prevents the blade from turning, whilst removing the bolt. You can see this method in my video above.
Washer
Lastly, you will need a washer to secure the blade in place. This will normally come supplied with the new blade – it ensures that the blade will not work loose during mowing.
In summary, before changing the blade on your lawnmower, make sure to gather the necessary tools, including gloves, a new blade, a wrench, and a washer. This will ensure that you have everything you need to complete the task without any interruptions.
Steps to Change Your Lawnmower Blade

Changing the blade on your lawnmower is a simple task that can be done in a few easy steps. Before starting, it’s important to read the manual for safety instructions. Here’s a step-by-step guide on how to change the blade on your lawnmower.
Step 1: Turn off the Lawnmower and Remove the Spark Plug (for Petrol)
Before changing the blade, it’s important to turn off the lawnmower, remove batteries, remove safety key and remove the spark plug, depending on the type of mower you have. This will prevent any accidental start-ups while you’re working on the mower. For cordless models it is essential, to not only remove the safety key but also the batteries. With a petrol mower, don’t just disconnect the spark plug but also remove it, so that the spark plug lead can’t accidentally make contact with the plug when the mower is worked on.
Step 2: Remove the Old Blade from the Mower Deck
To remove the old blade, you’ll need to first remove the bolt that holds it in place. Use a socket wrench to loosen and remove the bolt in a counter clockwise direction. If the bolt is tight, and you can’t hold the blade whilst loosing the bolt, then the blade will need to be locked off. Insert a piece of wood between the blade and the exit chute, to stop the blade from turning. Alternatively, clamp some locking pliers to the deck again to stop the blade from turning, whilst you loosen the bolt. For demonstration of this see my video above.
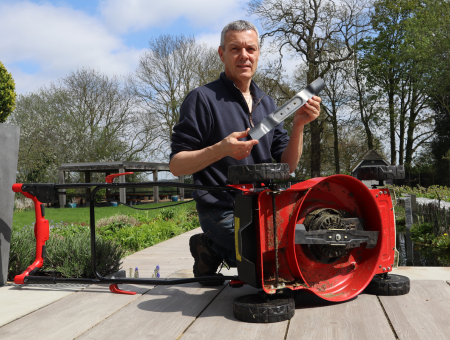
Once the bolt is removed, carefully lift the old blade off the mower deck. Be sure to handle the blade with care, as it may still be sharp.
Step 3: Install the New Blade on the Mower Deck

To install the new blade, carefully place it onto the mower deck in the same position as the old blade. Make sure that the blade is properly aligned and that the bolt holes match up. Ensure that the blade is the correct way up, this can be determined by either writing on the blade indicating the correct way up. Some modern mowers will only allow the blade to be fitted one way, the right way. Once the blade is in place, insert the bolt and tighten it by hand in a clockwise direction.
Step 4: Tighten the Bolt in a Clockwise Direction
Using a socket wrench, tighten the bolt in a clockwise direction until it is snug. Be careful not to over-tighten the bolt, as this can damage the lawnmower. Once the bolt is tightened, double-check to make sure that the blade is securely in place.
In conclusion, changing the blade on your lawnmower is a simple task that can be done in just a few easy steps. By following the steps outlined above, you can ensure that your lawnmower is operating safely and efficiently.
Conclusion
It is important to note that regular maintenance of your lawnmower, including blade replacement, can significantly extend the life of your machine. By taking care of your lawnmower, you can avoid costly repairs and replacements in the future.
If you encounter any issues during the blade replacement process, it is recommended that you seek professional lawn mower repair services from a qualified technician. They can help you diagnose and fix any problems with your machine.
I hope that this guide “How to Change the Blade on Your Lawnmower” has been helpful in assisting you with changing the blade on your lawnmower. Remember to always follow safety precautions when handling sharp objects and to refer to your lawnmower’s manual for specific safety instructions.
8 Steps To Choosing The Best Cordless Lawn Mower Video Guide
Final Thoughts
I know there’s a lot to think about when it comes to choosing a lawn mower, but it really is worth taking the time to weigh up your options. If you’re still unsure, I have lots of helpful information throughout this website to make it easier for you. Why not try out my tool where you can simply enter your requirements and I’ll recommend the best matched mowers for you. Together, we’ll find a great lawn mower for you and your garden!
As a seasoned expert in the field of garden power tools, I have dedicated over a decade to working with and reviewing a wide variety of lawn mowers. My extensive experience has allowed me to gain a deep understanding of the benefits and limitations of different types of mowers and garden tools.
Over the years, I have honed my skills in writing informative articles and creating helpful videos for various blogs and publications. This has given me the ability to not only recognise what makes a good lawn mower, but also to help you choose the perfect garden tool for your specific needs and requirements.
With my wealth of knowledge and expertise, I am confident that I can provide you with valuable insights and recommendations when it comes to selecting the right lawn mower for your lawn. So, whether you're looking for a battery cordless, electric, petrol, or robotic mower, you can trust in my expertise to guide you towards the best option for your garden.


